This walking taco casserole is everything you love about taco night, just baked into one cheesy, crunchy, crowd-pleasing dish. It’s the kind of recipe that brings everyone to the table fast. Whether it’s a weeknight dinner, game day snack, or potluck hit, this one’s a winner every time. The first time I made it, my family went back for seconds and thirds. It’s one of those meals that disappears before you’ve even had a chance to sit down!
Table of Contents
Why You’ll Love This Walking Taco Casserole
If you love tacos but hate the mess, this recipe is your new best friend. It’s got all the flavor of classic walking tacos, savory seasoned beef, crunchy chips, gooey cheese, and all your favorite toppings, but layered into a simple bake. No individual bags, no fuss. Plus, it’s super customizable. Whether you’re feeding picky eaters or spicing things up for taco lovers, you can easily tweak it your way. And leftovers? Even better the next day.
Ingredients You’ll Need
Essential Ingredients

Here’s what you’ll need to bring this casserole to life:
- Ground beef (or turkey for a leaner twist)
- Taco seasoning (store-bought or homemade)
- Onion and garlic for flavor
- Black beans or pinto beans
- Salsa or Rotel tomatoes
- Corn chips (Fritos or Doritos work great)
- Shredded cheese (cheddar or a Mexican blend)
- Optional toppings: sour cream, shredded lettuce, tomatoes, jalapeños, olives
Note: You can find the printable recipe with exact measurements below.
Tools You’ll Need
No fancy gear required! Just grab a large skillet, a 9×13 baking dish, a mixing spoon or spatula, a knife and cutting board, and measuring cups or spoons.
Ingredient Swaps and Variations
Vegetarian and Meatless Alternatives
Skip the meat and double up on the beans, or use plant-based ground “beef.” I’ve also tossed in sautéed zucchini or mushrooms when I had some to use up, super tasty!
Gluten-Free Options
Just make sure your taco seasoning and chips are certified gluten-free. Most corn chips are naturally GF, but it’s always good to double-check the label.
Healthier Ingredient Substitutions
Use baked chips instead of regular ones, swap in low-fat cheese, and go with ground turkey or chicken for a lighter version. I’ve even added chopped spinach or bell peppers to sneak in some veggies!
How to Make Walking Taco Casserole
Step-by-Step Guide
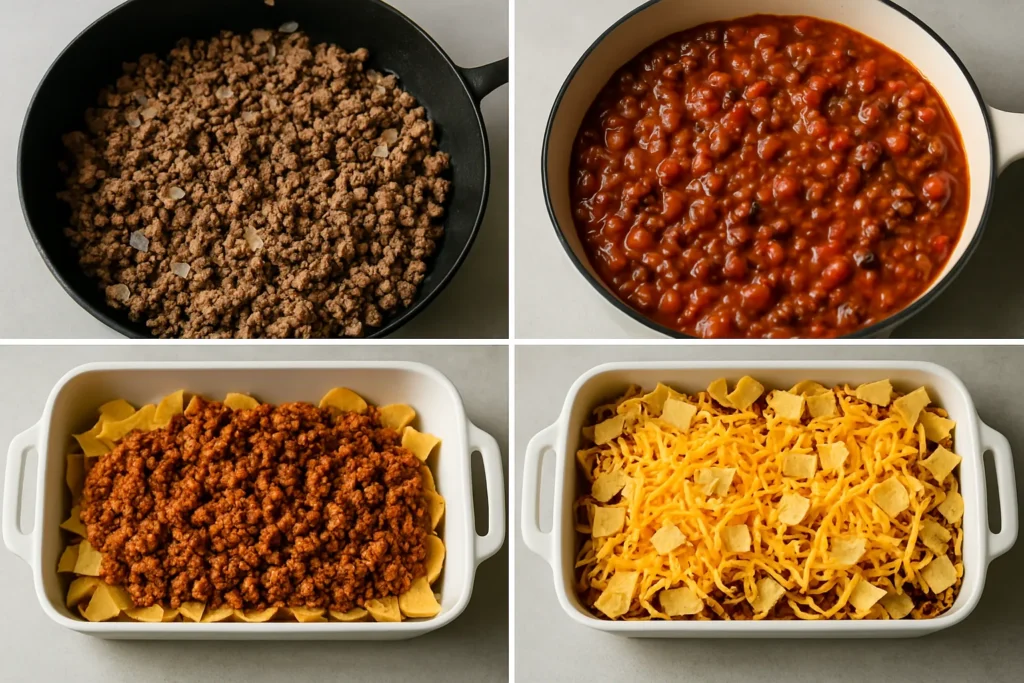
1. Cook the Ground Beef Mixture
In a large skillet over medium heat, cook the ground beef with diced onion until the meat is browned and the onions are soft. Drain any excess fat. Add minced garlic and stir until fragrant. This savory base is the heart of the casserole, so let those flavors develop nicely.
2. Assemble the Layers
Grab your 9×13 baking dish and start with a layer of crunchy corn chips on the bottom. Then spoon the seasoned meat mixture over the chips, spreading it evenly. This layering locks in the flavor and gives you that perfect combo of crispy and saucy in every bite.
3. Add Cheese and Chips
Sprinkle a generous layer of shredded cheddar cheese over the meat. You can use cheddar, Mexican blend, or your favorite mix. Top it off with a handful of corn chips for that extra crunch. Don’t worry if it looks piled high, it will all melt and bake together beautifully.
4. Bake the Casserole
Place the dish in a preheated oven at 350°F (175°C) and bake for about 15 to 20 minutes. You will know it is ready when the cheese is melted and bubbly. If you like a little golden edge, broil it for 2 extra minutes at the end, but keep an eye on it!
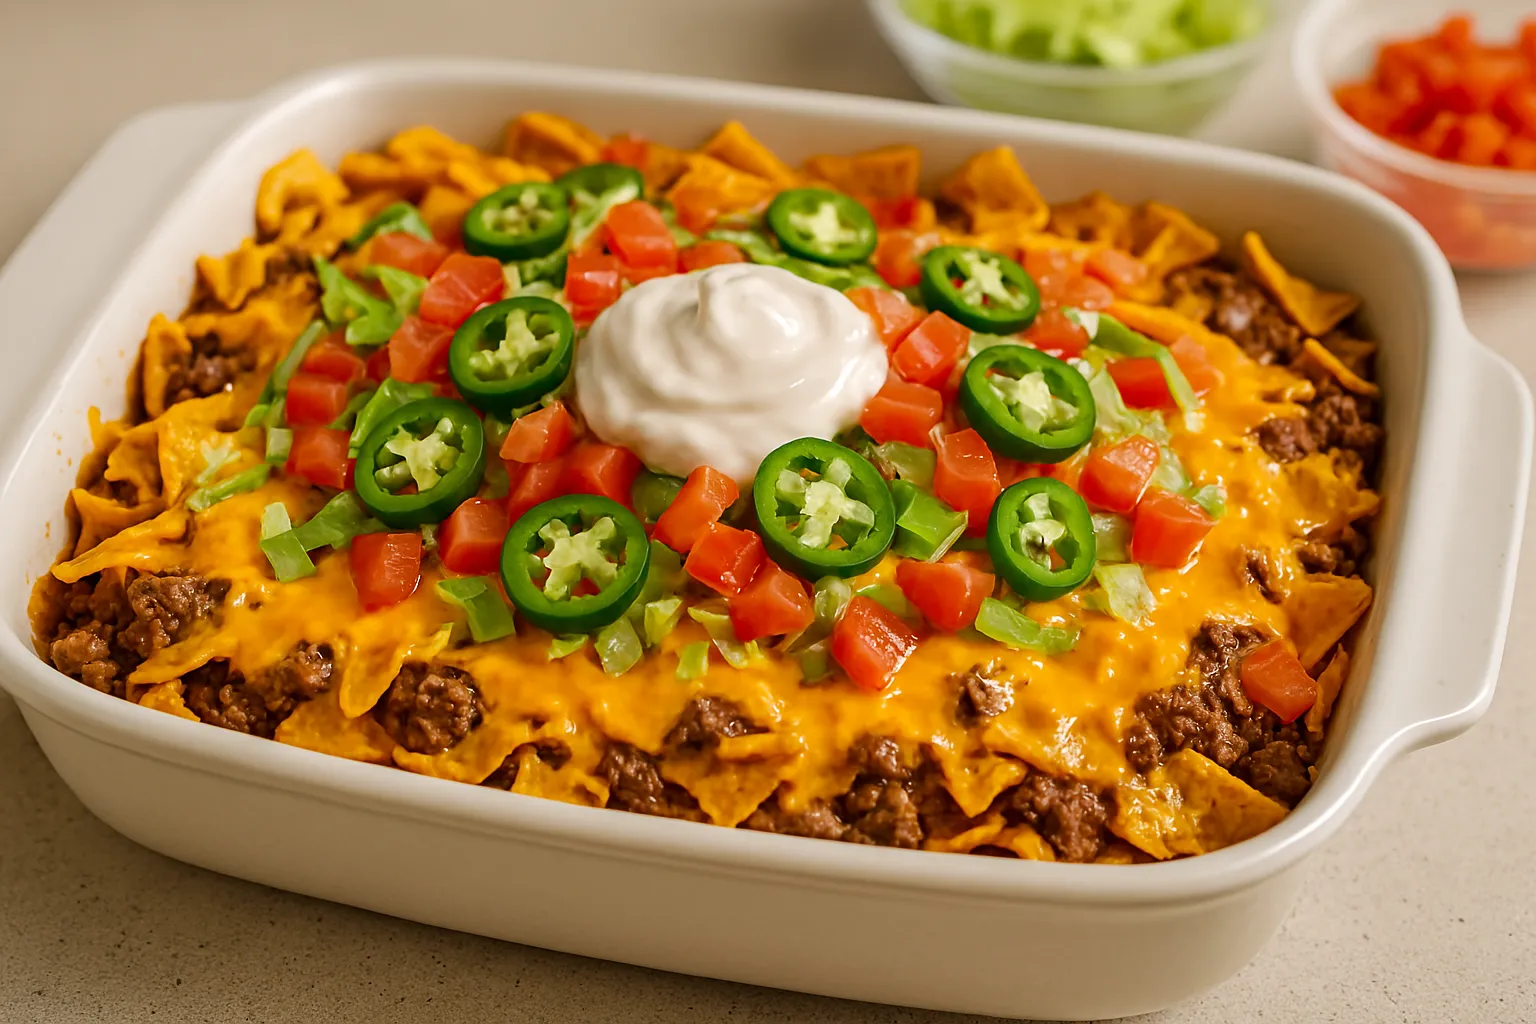
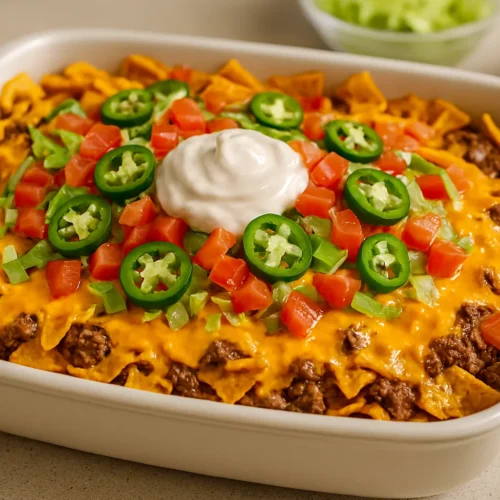
5. Add Toppings and Garnishes
Once it is out of the oven, let it rest for a few minutes. Then add your toppings: shredded lettuce, diced tomatoes, sliced jalapeños, black olives, and a dollop of sour cream. This is the part where it really starts to look and taste like taco night in a dish.
6. Serve Warm and Enjoy
Scoop into generous portions and serve while it is hot. The layers hold together just enough to make each bite flavorful and fun. My family loves pairing it with extra salsa or guacamole on the side. Leftovers, if there are any, taste even better the next day!
Alternative Cooking Methods
Slow Cooker Method
Cook the beef mixture as usual, then transfer it to a slow cooker. Add the beans and salsa, stir well, and cook on low for 4 hours. Before serving, sprinkle cheese and chips on top, cover, and heat for another 10 to 15 minutes until melted and warm.
Skillet Method (Stovetop Version)
After cooking the meat and adding salsa and beans, layer the chips and cheese right into a large oven-safe skillet. Cover and heat on low until the cheese melts. This method is great if you want to skip using the oven and keep cleanup simple.
Helpful Tips and Tricks
Tips for Making the Best Walking Taco Casserole
For max flavor, brown your meat well and don’t skimp on the taco seasoning, it’s what ties everything together. Layer chips last if you want that extra crunch on top. I also like to use freshly shredded cheese (not the pre-bagged kind) for better melt and flavor. And here’s a fun twist, mix a little cream cheese into the meat layer for a creamy surprise. Trust me, it makes it extra cozy and crave-worthy!
Common Mistakes to Avoid
Avoid adding chips too early if you plan to prep ahead, they’ll get soggy. Save toppings like lettuce or sour cream for after baking. Another common slip, overseasoning. If you’re using pre-seasoned chips or spicy salsa, go easy on the taco seasoning to keep it balanced. And don’t forget to drain your beans and meat well, extra liquid can turn your casserole into soup, and not in a good way!
How to Serve Walking Taco Casserole
Perfect Side Dishes and Pairings
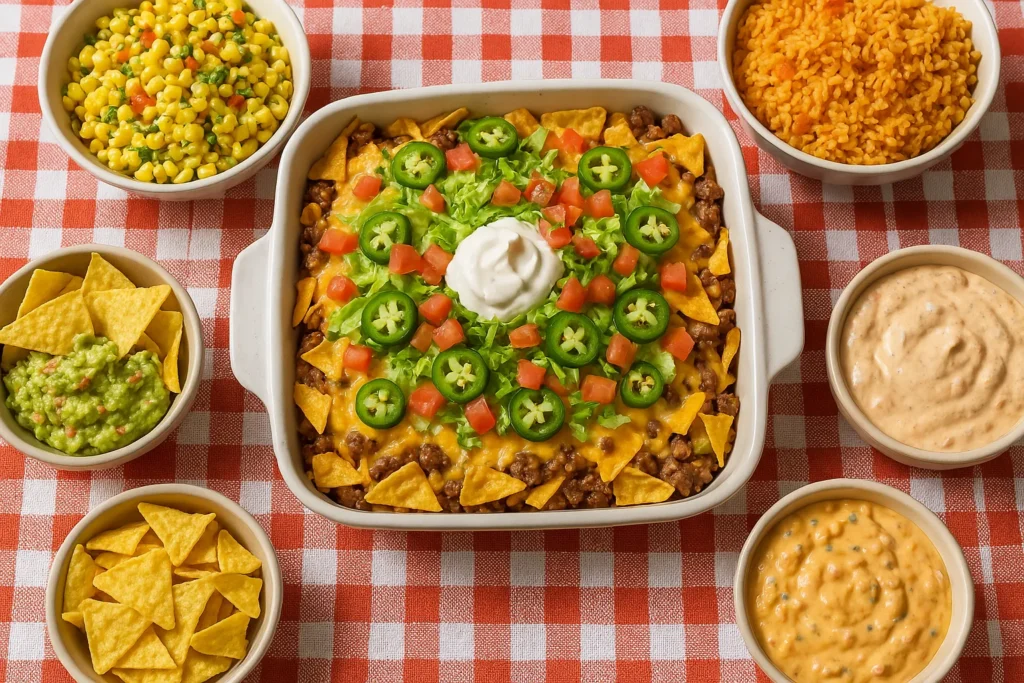
This casserole is a meal in itself, but if you want to round things out, serve it with something fresh and fun on the side. A crisp side salad, some Mexican rice, or a tangy corn salad works great. Want to go all in on taco night? Pair it with this Best Taco Dip Recipe, it’s creamy, zesty, and always a hit at our house.
Topping and Garnishing Ideas
Here’s where the fun begins! Set up a topping bar so everyone can build their own plate. Think shredded lettuce, diced tomatoes, jalapeños, black olives, sour cream, green onions, and maybe even a drizzle of hot sauce. Want to make it pop? Add chopped cilantro or crushed chips right before serving for texture. Sometimes I sprinkle a little lime zest on top too, it brightens everything up and makes it feel extra fresh.
Walking Taco Casserole Nutrition Facts
Calories and Nutritional Breakdown
Here’s a quick look at the nutritional profile per serving. Keep in mind this will vary slightly depending on the chips and toppings you use, but it gives you a solid estimate for a standard portion:
| Nutrient | Amount per Serving | Notes |
|---|---|---|
| Calories | 420 kcal | Estimate with standard toppings |
| Protein | 24g | From beef and cheese |
| Carbohydrates | 28g | Mostly from chips and beans |
| Fat | 22g | From cheese and beef |
| Saturated Fat | 9g | Comes mostly from cheese |
| Cholesterol | 75mg | From ground beef |
| Sodium | 610mg | Depends on seasoning and chips |
| Fiber | 4g | Boosted by beans |
| Vitamin C | 10% DV | From salsa and toppings |
| Iron | 12% DV | From beef and beans |
Tips to Lighten It Up
Want to make it a bit lighter? Try using ground turkey or lean beef, and opt for baked corn chips. Swap regular cheese with reduced-fat versions, and pile on fresh toppings like lettuce and tomatoes instead of adding more chips. I’ve even stirred in some zucchini or spinach to sneak in extra veggies, no one ever noticed!
How to Store & Reheat for Later
Storing Leftovers Correctly
If you’ve got leftovers, let the casserole cool completely before storing. Transfer portions to an airtight container and pop them in the fridge. It’ll keep well for 3 to 4 days. To keep chips from getting too soggy, consider storing them separately and sprinkling on fresh ones right before reheating. This way, you still get that signature crunch even the next day!
Freezing and Thawing Tips
You can freeze walking taco casserole before or after baking, just skip adding the chips until you’re ready to serve. Wrap the dish tightly in foil and freeze for up to 2 months. Thaw it overnight in the fridge before baking or reheating. If freezing leftovers, portion them out and freeze in individual containers for easy lunches or weeknight dinners.
Best Ways to Reheat
Reheat single servings in the microwave for 1 to 2 minutes, adding a sprinkle of fresh cheese or chips if you like. For bigger portions, use the oven, bake at 350°F for about 15 to 20 minutes until hot and bubbly. I like to toss on a handful of chips in the last 5 minutes so they crisp up. A quick splash of salsa or a dollop of sour cream on top brings it all back to life!
Frequently Asked Questions
Can I make Walking Taco Casserole ahead of time?
Yes, you can prep the whole casserole a day in advance. Just assemble everything except the top layer of chips, cover, and refrigerate. When you’re ready to bake, add the chips on top and pop it in the oven. This helps keep the chips crisp instead of soggy.
How long can I store leftovers in the refrigerator?
Leftovers stay fresh in the fridge for up to 3 to 4 days. Store them in an airtight container and reheat as needed. For best results, keep any extra toppings like lettuce or sour cream separate and add them fresh after reheating so everything tastes just made.
Can Walking Taco Casserole be frozen?
Absolutely, freeze it before or after baking, just skip adding the chips until you’re ready to serve. Wrap the dish tightly and freeze for up to 2 months. Thaw it overnight in the fridge before reheating, and toss on fresh chips and toppings right before serving for the best texture.
What healthier ingredients can I substitute?
You can make this casserole lighter by using lean ground turkey, low-fat cheese, and baked tortilla chips. Skip or reduce the cheese if you want to cut back on fat. I also like adding sautéed veggies like zucchini, spinach, or peppers to boost the nutrition without sacrificing flavor.
Is Walking Taco Casserole gluten-free?
It can be, just be sure to use gluten-free corn chips and taco seasoning. Many brands are naturally gluten-free, but always double-check the label. Also, make sure any canned ingredients like beans or tomatoes don’t have added gluten. With a few smart swaps, this dish works for gluten-free eaters.
Can I use chicken or turkey instead of beef?
Definitely, ground turkey or shredded rotisserie chicken both work great in place of ground beef. If using cooked chicken, just mix it with taco seasoning and a splash of broth or salsa to keep it juicy. It’s a great way to switch things up or use leftovers!
More Easy Dinner Recipes
If you loved this walking taco casserole, here are a few more easy dinners worth trying next:
- Try this Air Fryer Italian Sausage Recipe for a quick dinner idea with crisp, juicy sausage.
- These Bacon Brown Sugar Chicken Tenders hit the perfect sweet-and-savory combo.
- For something fun and tropical, make this Hawaiian Chicken Sheet Pan easy clean-up included.
Walking Taco Casserole
Equipment
- Skillet
- Baking Dish
Ingredients
Walking Taco Casserole Ingredients
- 1 lb ground beef or ground turkey for a leaner version
- 2 tbsp taco seasoning
- 1 medium onion diced
- 2 cloves garlic minced
- 1 can black beans 14 oz, drained and rinsed
- 1 cup salsa
- 4 cups corn chips
- 2 cups shredded cheddar cheese or Mexican blend cheese
Toppings
- ½ cup sour cream
- 1 cup shredded lettuce
- 1 cup diced tomatoes
- ¼ cup sliced jalapeños
- ¼ cup sliced olives
Instructions
- Cook ground beef with diced onion in a large skillet over medium heat until browned. Drain excess fat, add minced garlic, and stir until fragrant.
- In a 9×13 baking dish, layer corn chips on the bottom and then evenly spread the seasoned beef mixture over the chips.
- Sprinkle shredded cheddar cheese over the beef mixture and top with additional corn chips for extra crunch.
- Bake in a preheated oven at 350°F for 15 to 20 minutes until the cheese is melted and bubbly. Optionally broil for 2 minutes for a golden edge.
- After baking, let the casserole rest for a few minutes. Top with shredded lettuce, diced tomatoes, sliced jalapeños, olives, and a dollop of sour cream.
- Scoop generous portions and serve warm. Enjoy with extra salsa or guacamole on the side.