
Craving something sweet but don’t want to spend hours in the kitchen? This Oreo Mug Cake is the ultimate quick-fix dessert! With just a few simple ingredients and a microwave, you’ll have a warm, chocolatey treat in under five minutes. No fancy equipment, no long prep time, just pure indulgence in a single-serving mug. Whether it’s a late-night craving, a fun activity with kids, or a last-minute dessert, this mug cake is always a winner. So grab some Oreos, a splash of milk, and let’s make the easiest, most delicious mug cake ever!
Table of Contents
Why You’ll Love This Oreo Mug Cake
- Quick & Easy – Ready in just five minutes from start to finish!
- Minimal Ingredients – You only need a few pantry staples.
- No Oven Needed – Just pop it in the microwave!
- Endlessly Customizable – Add chocolate chips, ice cream, or drizzle with caramel.
- Single-Serving Dessert – Perfect for when you want something sweet without leftovers!
Ingredients You’ll Need
Making an Oreo Mug Cake couldn’t be simpler! You’ll need just three basic ingredients plus a few optional add-ins to make it even more delicious.
Essential Ingredients
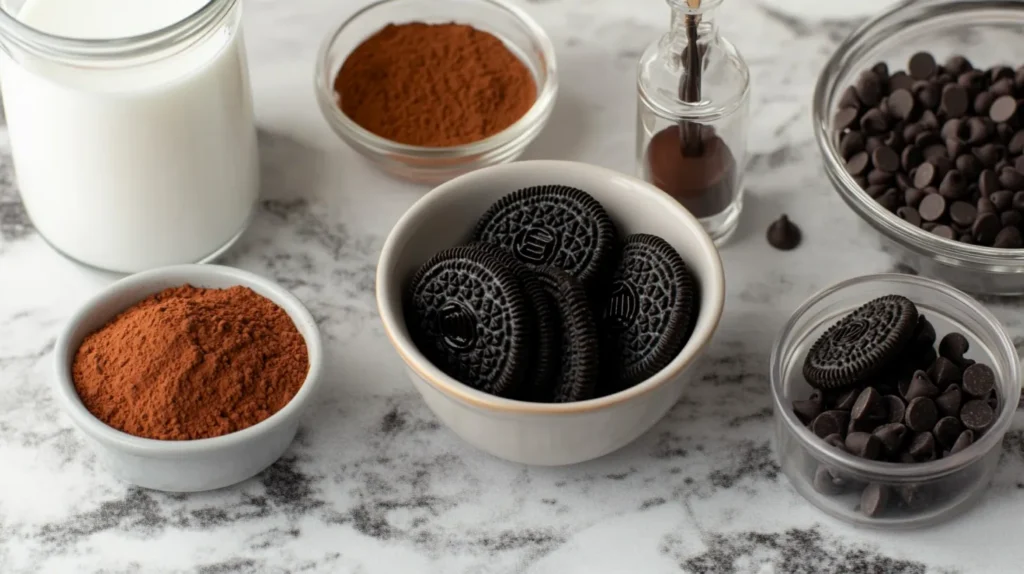
- Oreo Cookies – The star of the show! Regular, Double Stuf, or any flavored Oreos work.
- Milk – Helps soften the cookies and create a smooth batter. Any kind of milk works!
- Baking Powder – A tiny bit of this helps the cake rise and stay fluffy.
Optional Add-ins:
- Sugar – If you like it extra sweet.
- Cocoa Powder – For an even richer chocolate flavor.
- Vanilla Extract – Adds depth to the taste.
- Chocolate Chips – Because more chocolate is always a good idea!
Note: You can find the printable recipe with exact measurements below.
Variations and Substitutions
Dairy-Free Alternatives
No dairy? No problem! Swap out regular milk with almond, oat, soy, or coconut milk for a delicious dairy-free Oreo Mug Cake. You can also use dairy-free chocolate chips if you’re adding extra chocolate. The texture remains just as soft and gooey, making it a perfect treat for everyone!
Low-Sugar Options
Looking to cut back on sugar? Use sugar-free Oreos and swap regular milk with unsweetened almond milk. You can also add a pinch of stevia or monk fruit sweetener instead of extra sugar. Skipping the chocolate chips will also help reduce the overall sweetness without sacrificing flavor.
Flavor Variations
Want to mix things up? Try using Golden Oreos for a vanilla twist or Mint Oreos for a refreshing chocolate-mint combo. Craving peanut butter? Stir in a spoonful of peanut butter for a nutty, creamy texture. You can even sprinkle crushed nuts or coconut flakes on top for extra crunch!
How to Make Oreo Mug Cake
Step-by-Step Guide to Oreo Mug Cake
1. Crush the Oreos:
Start by placing your Oreos in a microwave-safe mug. Use a fork or spoon to crush them into fine crumbs. You can also put them in a ziplock bag and smash them with a rolling pin before adding them to the mug. The finer the crumbs, the smoother your cake texture will be!
2. Mix in the Milk:
Pour milk over the crushed Oreos and stir well. The cookies will begin to soften and absorb the liquid, creating a thick, cake-like batter. Make sure all the Oreo pieces are fully soaked, and no dry bits remain. The mixture should be smooth but not overly runny.
3. Add Optional Ingredients:
Now’s the time to get creative! Stir in a pinch of baking powder to help it rise, or add cocoa powder for an intense chocolate flavor. If you love a richer cake, mix in chocolate chips or a splash of vanilla extract. This step is totally customizable to your taste!
4. Microwave the Batter:
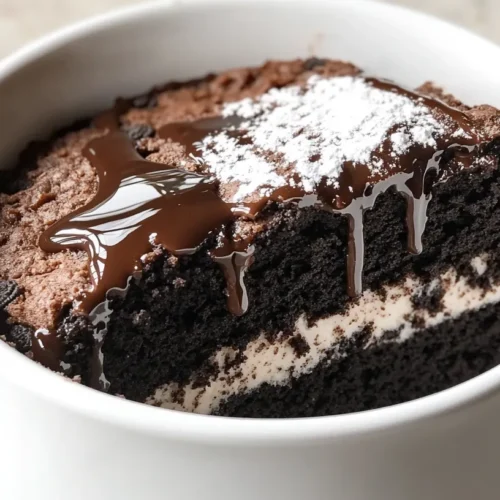
Place your mug in the microwave and heat on high for 60 to 90 seconds. Microwave times vary, so start with 60 seconds and check. The batter should rise and set into a fluffy, cake-like texture. Avoid overcooking, as it can dry out the cake.
5. Check for Doneness & Serve:
Once cooked, carefully touch the top of the cake—it should feel soft and springy. If it looks undercooked, microwave for another 10 to 15 seconds. Let it cool slightly before digging in. For an extra treat, top it with whipped cream, ice cream, or a drizzle of chocolate syrup!
Alternative Cooking Methods
Baking in the Oven
No microwave? No problem! Preheat your oven to 350°F (175°C). Pour the Oreo mixture into an oven-safe ramekin and bake for 12 to 15 minutes or until the cake is set in the center. Keep an eye on it, as baking times may vary. Let it cool for a few minutes before enjoying!
Using an Air Fryer
For a slightly crispier top, try using an air fryer. Preheat the air fryer to 320°F (160°C) and place the batter-filled mug inside. Cook for about 8 to 10 minutes, checking at the 8-minute mark. The cake should be fluffy yet slightly firm on top. Let it rest for a minute before indulging!
Helpful Tips and Tricks
Tips for the Best Oreo Mug Cake
- Use a microwave-safe mug that’s at least 12 oz to prevent overflow.
- Adjust microwave time based on your wattage. Start with 60 seconds and add time as needed.
- Crush Oreos finely for a smoother texture, or leave some chunks for extra bite!
- Let it rest for a minute after microwaving, it helps the flavors settle and prevents burns.
- Top it off with ice cream, Nutella, or crushed Oreos for extra indulgence!
Common Pitfalls to Avoid
- Overcooking the cake, it can dry out quickly, so microwave in short intervals if unsure.
- Using too much milk, the batter should be thick, not soupy. Start with a little and add more if needed.
- Skipping the baking powder, without it the cake won’t rise as well.
- Using a small mug, the batter needs room to expand, or it may overflow.
- Not mixing thoroughly, make sure all Oreo crumbs are fully soaked for even texture.
How to Serve
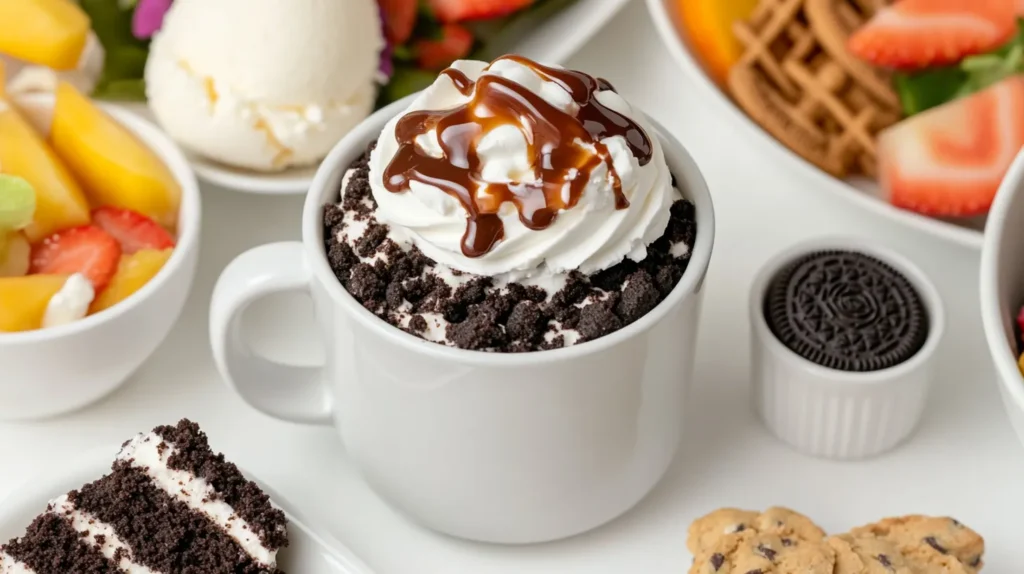
Best Toppings for Oreo Mug Cake
Take your Oreo Mug Cake to the next level with delicious toppings! Add a scoop of vanilla ice cream for a creamy contrast, or drizzle chocolate syrup for extra indulgence. A dollop of whipped cream makes it even more decadent, while crushed Oreos or chocolate chips add a crunchy texture.
Pairing Ideas for a Perfect Dessert
Want to turn your mug cake into an ultimate dessert experience? Pair it with a glass of cold milk for a classic combo or enjoy it with a scoop of coffee ice cream for a mocha twist. For a double chocolate treat, try it alongside this Cookie Oreo Brownie Recipe, pure chocolate heaven!
Oreo Mug Cake Nutrition Facts
Caloric Breakdown and Key Nutrients
Here’s a rough estimate of the nutritional value per serving:
| Nutrient | Amount per Serving | Notes |
|---|---|---|
| Calories | 350 kcal | Approximate per mug cake |
| Protein | 6g | Comes from milk and Oreos |
| Carbohydrates | 50g | Mostly from Oreos and milk |
| Fat | 15g | Includes fat from cookies |
| Saturated Fat | 5g | From Oreo cream filling |
| Cholesterol | 10mg | Can vary with milk choice |
| Sodium | 200mg | From Oreos |
| Fiber | 2g | Minimal amount |
| Sugar | 30g | Can be reduced with alternatives |
| Calcium | 10% DV | Comes from milk |
Healthier Ingredient Swaps
- Use almond or oat milk instead of regular milk for a dairy-free option.
- Opt for sugar-free Oreos to lower overall sugar content.
- Replace some Oreos with cocoa powder for a more balanced treat.
- Skip extra chocolate chips if you want to reduce fat and sugar.
- Try a high-protein version by adding a teaspoon of protein powder!
How to Store & Reheat For Later
Storing Leftovers the Right Way
While this mug cake is best enjoyed fresh, you can store leftovers for later. Let the cake cool completely, then cover the mug with plastic wrap or transfer the cake to an airtight container. Keep it in the refrigerator for up to 24 hours. For longer storage, freeze in a sealed container for up to one month.
How to Reheat Without Drying It Out
To reheat, microwave the mug cake for 15 to 20 seconds on medium power. If it feels dry, add a splash of milk before reheating to restore moisture. For a softer texture, cover it with a damp paper towel while microwaving. If reheating from frozen, let it thaw in the fridge first for the best results.
Frequently Asked Questions
Can I make an Oreo Mug Cake without milk?
Yes! If you’re out of milk or need a dairy-free option, simply use water, almond milk, oat milk, or coconut milk instead. While milk adds creaminess, water still works fine. Just be sure to mix well so the cookies fully absorb the liquid for a soft texture.
How do I make my mug cake extra moist?
For a softer, fluffier mug cake, add a teaspoon of oil or melted butter to the batter. You can also mix in a small spoonful of yogurt, mashed banana, or applesauce to keep it moist. Avoid overcooking, as too much microwave time can make the cake dry and rubbery.
Can I use different Oreo flavors for this recipe?
Absolutely! Try Golden Oreos for a vanilla twist, Mint Oreos for a refreshing flavor, or Birthday Cake Oreos for extra sweetness. You can even mix and match flavors for a fun twist. Any Oreo variety works, so feel free to get creative with your favorite flavors!
What size mug should I use for best results?
Use a 12 to 14-ounce microwave-safe mug to prevent overflowing. If your mug is too small, the cake may spill over while cooking. A taller mug works best, as it gives the batter enough space to rise properly while staying light and fluffy.
Can I make this recipe without a microwave?
Yes! If you don’t have a microwave, you can bake the batter in an oven-safe ramekin at 350°F (175°C) for 12 to 15 minutes or cook it in an air fryer at 320°F (160°C) for 8 to 10 minutes. Just keep an eye on it to avoid overcooking!
Why did my mug cake turn out rubbery?
A rubbery texture usually means the cake was overcooked or had too much liquid. To fix this, microwave in shorter bursts, use a little less milk, and add a pinch of baking powder to improve texture. Also, be sure to let it cool slightly before digging in, it firms up as it sets!
More Easy Dessert Recipes
Looking for more quick and delicious desserts? Try these easy-to-make treats:
- Chocolate Greek Yogurt Dessert Recipe is a creamy, healthy treat.
- Healthy Donuts Recipe offers a light twist on classic donuts.
- Irresistible Peach Crumble Recipe gives you a warm, fruity dessert option.
Enjoy experimenting with these easy recipes and don’t forget to share your results in the comments below!
Oreo Mug Cake Recipe
Equipment
- Microwave
- Microwave-safe mug
Ingredients
Essential Ingredients
- 3 cookies Oreo Cookies Regular, Double Stuf, or flavored Oreos work best
- ¼ cup Milk Any type of milk works; use dairy-free if needed
- ¼ tsp Baking Powder Helps the cake rise
Optional Add-ins
- 1 tsp Sugar Optional for extra sweetness
- 1 tbsp Cocoa Powder For a richer chocolate flavor
- ½ tsp Vanilla Extract Adds depth to the flavor
- 1 tbsp Chocolate Chips Optional for extra chocolatey goodness
Instructions
- Place the Oreo Cookies in a microwave-safe mug and crush them into fine crumbs.
- Pour the Milk over the crushed Oreos and stir until well combined.
- Add the Baking Powder and any Optional Add-ins such as Sugar, Cocoa Powder, Vanilla Extract, and Chocolate Chips. Stir gently.
- Microwave the batter on high for 60 to 90 seconds until the cake is set and fluffy.
- Let the cake cool slightly for about 1 minute, then serve with your favorite toppings.